前回作ったプロファイルを呼び出します。
Select the last profile and run.

前回作成したプロファイルをベースにより実戦に近い設定に変更していきます。
今回はSamsungBdieメモリを使った標準的な設定で説明したいと思います。
BCLK Frequency : DRAM Frequency Ratioを100:133に、DRAM Frequencyを任意のクロックに設定します。
メモリクロックは3866から4000くらいで調整してみましょう。
Based on the last profile, change to settings that can be used in practice.
I will explain with the standard setting using SamsungBdie memory.
BCLK Frequency:Set DRAM Frequency Ratio to 100:133 and DRAM Frequency to any clock.
Adjust memory clock from 3866 to 4000.

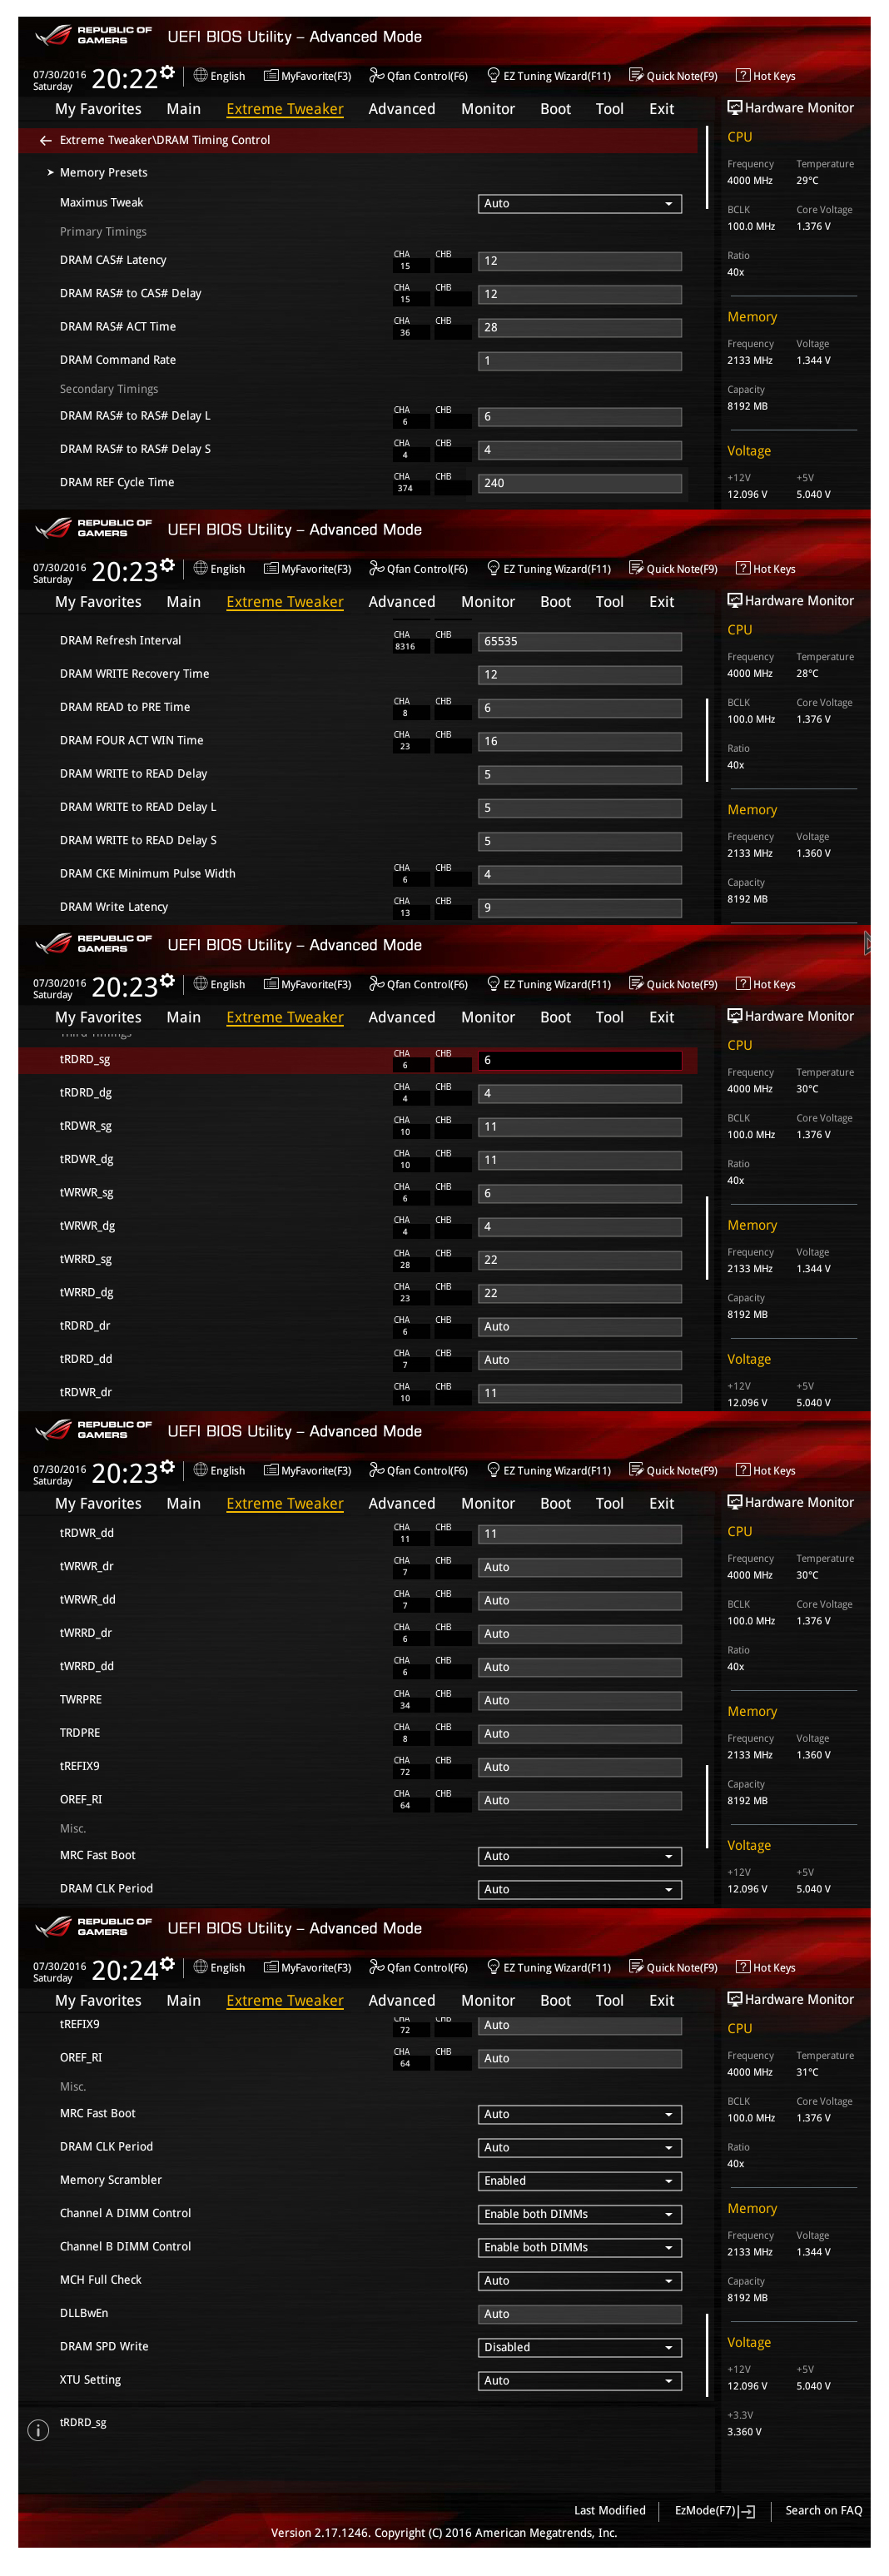
DRAM Timing Controlに入りメモリタイミングを入力していきます。
これはSamsungBdieの最低限必要なメモリ設定で、だいたいのベンチマークに応用できます。
Enter memory timing in DRAM Timing Control.
This setting is the minimum required memory setting of SamsungBdie.
It can be used for most benchmarks.
更に上を目指す方のために、後日、細かいメモリタイミングの設定方法を別の記事でアップしますので、メモリに拘りたい方はそちらを参考にしてください。
For those who want to aim more, I will upload the detailed setting method of memory timing in another article.
Please refer to that who particular about memory.
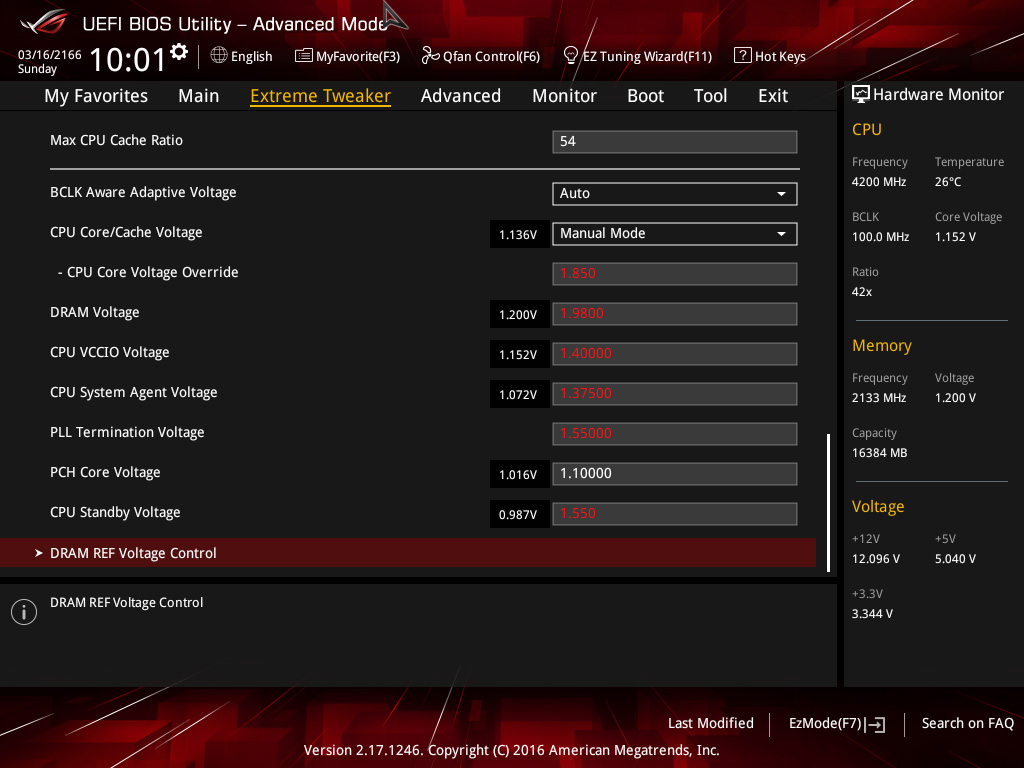
Extreme Tweakerに戻って画像のように電圧や数値を変更していきます。
Return to Extreme Tweaker and change the voltage and numeric value like the image.
最後にASUS Overclocking Profileに入り任意の名前を付けて保存します。(今回はLN2p2)
前回作成したプロファイルと合わせて2パターンのプロファイルができました。
Finally enter ASUS Overclocking Profile and save it with any name. (This time LN2p2)
You have two profiles.

使い方としては、-100℃くらいまで冷やしたら前回作成したプロファイルLN21をASUS Overclocking Profileから読み込んでOSを起動。
POTの温度が下がりきったら、一旦再起動させてBIOSに入り今回作成したLN2p2を読み込みOSを再起動させます。
電圧やメモリ設定がベンチマーク用に変更になった状態で起動してますので、あとはOS上でターボVを使って電圧とクロックを微調整するだけです。
When cooling down around -100c, load the profile LN21 from ASUS Overclocking Profile and start the OS.
When the temperature of POT down to the limit, restart it, enter BIOS, load LN2p2 and reboot the OS.
It is booting with the voltage and memory setting changed for benchmark, just tweak the voltage and clock using TurboV in OS.
備考/Notes
-スイッチ類の使い方-
-How to use switches-
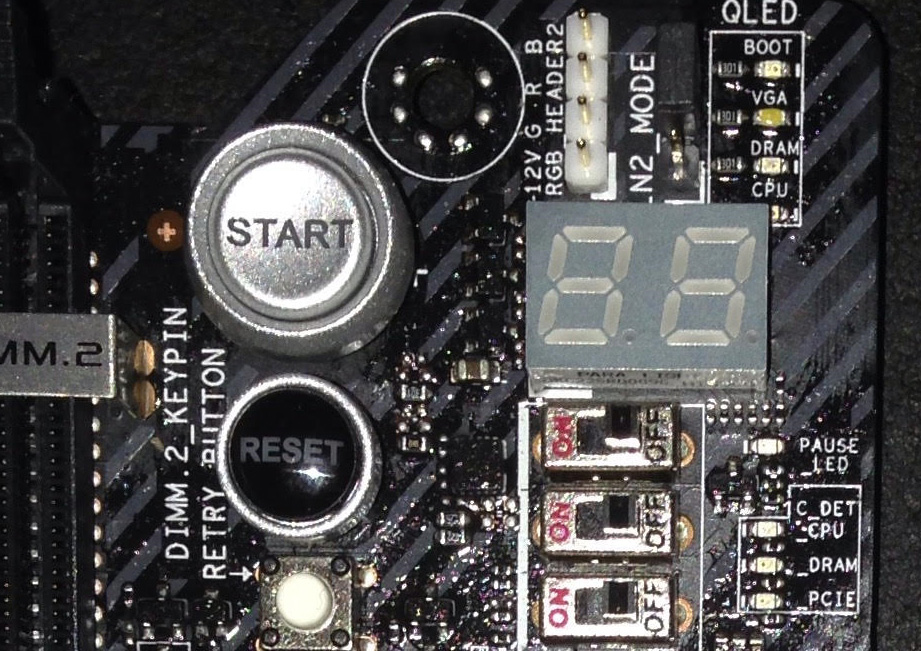
CBBスイッチ/CBB switch
まずこれは一番重宝するでしょう。
名前のとおりCBB(コールドブートバグ)を解除するスイッチです。
画像の3つ並んでるスイッチの一番下になります。
This switch will be most useful.
Improve CBB (cold boot bug).
The bottom of the three switches of the image.
7700kはロットにもよりますが、3個に1個くらいはCBB付の石が存在します。
使い方はPOTの温度が下がりきった状態で再起動出来ない場合にスイッチONします。
これでほとんどは解決できますが、POTの底に窒素が残ってる状態ではそれでもCBBが出る場合もあります。
その場合でも、窒素が完全にPOTから消えて温度が上がり始めたら再起動できるケースが多いです。
Z170の時のように-130℃や-100℃まで温めなくても済みますので、非常に効率的ですね。
注意点としては-100℃より暖かい温度では使用すると逆に起動不良を起こす事がありますので、温かい温度域ではオフにしておきましょう。
もちろん空冷時もです。石は死にはしませんが(笑)ポストコードは00のままで起動出来ません。
In one third of 7700k have CBB.(depends on the lot)
Turn on the switch when the temperature of the POT down to the limit and can’t be rebooted.
Most CPUs can be solved with this switch.
But if LN2 remains in POT, CBB may come out.
Even so, after ln2 disappears from POT and the temperature goes up it will reboot.
It is very efficient as it doesn’t have to warm up to -130c or -100c like Z170.
Please be aware that if you use at warmer temperature than -100c, boot failure will occur.
Let’s turn it off at warm temperature.
Of course also at the air cooling.
Although the CPU doesn’t die, it can’t be booted because it is post code 00.
スローモードスイッチ/Slow mode switch
画像の3つ並んでるスイッチの一番上になります。
The top of the three switches of the image.
一般的な使い方としましては、ベンチマークを完走した後SSを残そうとCPU-Zなどを立ち上げますが、限界の領域だとCPU-Zを立ち上げる途中でフリーズしてしまうケースもよくあります。
ベンチマークが無事完走したら、スローモードスイッチをオンにします。
そうするとクロックが最低倍率(100×8=800MHz)まで瞬時に落ちますので、システムが非常に楽になります。
ベンチマークのスコアとCPU-Zが全て立ち上がったら、スイッチを元通りオフに戻します。
これでSSの取りこぼしは無くなると思います。
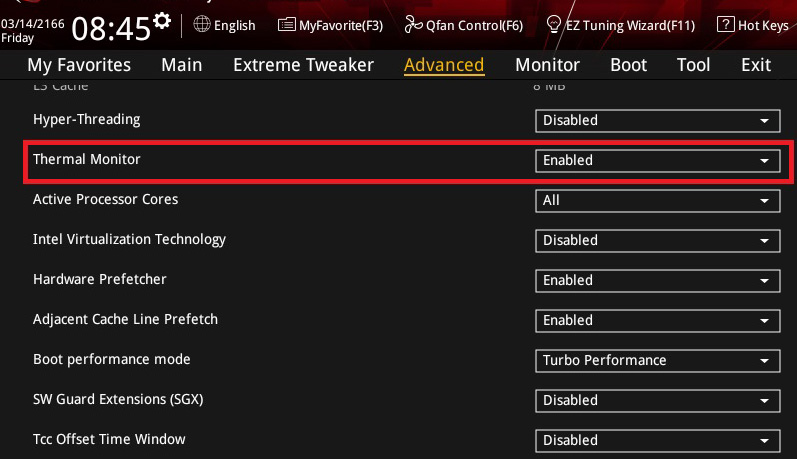
ただし、あらかじめBIOSのThermal Monitor をEnabledにしておかないとスイッチは反応しませんのでご注意下さい。
When booting CPU-Z to leave SS after completed the benchmark, it may freeze on the way.
Turn on the slow mode switch when the benchmark completes.
Then the clock down to the lowest magnification (100×8=800MHz), so the system becomes very easy.
When the benchmark score and CPU-Z boot up, turn off the switch.
The loss of SS will be gone.
However, the switch will not respond unless the Thermal Monitor of the BIOS is set to Enabled.
Be careful.
-ポストコード-
-Post code-
基本的に待ちが長いポストコードは02/04/05/22/66/4F/78/79/99/A2などです。
それ以外はエラーコードですので再起動させた方がいいでしょう。
特に22が長い板がありますので根気よくやりましょう。
25や71はCBBの時によく出現します。
CCはメモリスロットにメモリが完全に刺さってない場合です。
00はOCerなら一番見たくないコードですね(笑)
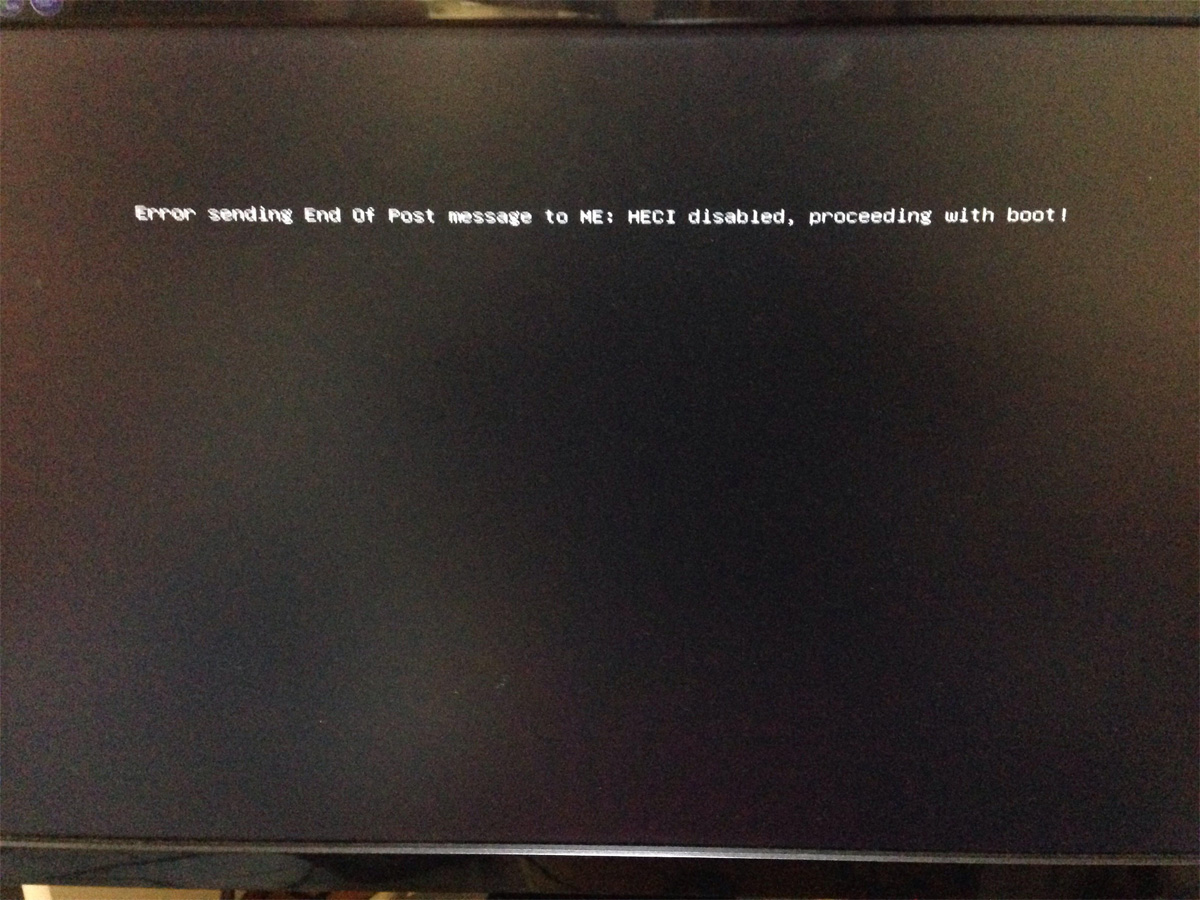
ちなみにこういう画面の時も待ちが長いので気長に待つようにしましょう。
Basically, postcodes with a long waiting time are 02/04/05/22/66/4F/78/79/99/A2 etc.
Other than those are error codes. You’d better reboot.
There are boards with a very long wait time of code22.
Let’s try persistently.
25 and 71 often appear at CBB.
CC is when memory is not perfectly stuck in the slot.
Of course OCer doesn’t want to see most is 00…lol
The screen like image also have a long wait time.
Have patience…
-CB(コールドバグ)が出てしまった場合-
-CB(cold bug)-
今回作ったプロファイル設定のままでは、稀にですが10個に1個くらいの確立でCBが出る石が存在します。
ですが、電圧の調整で私の場合は全てCBを解除できました。
以下の点に注意してBIOS設定を微調整してみてください。
1.DMI Voltageを1.8vから1.85v、もしくはそれ以上に設定する
2.Core PLL Voltageを2.2vから最大値である2.4vに変更する
3.PLL Termination Voltageを1.55vから1.35vに変更する
4.PLL Bandwidthの数値を調整する(2から6の間)
これらの電圧設定はCPUごとに最適な値が微妙に異なりますので、それでも駄目なら増やしてみたり逆に減らしてみたり微調整を試みて下さい。
With this profile setting, rare CPUs have CB.
In my case CB could be improved by adjusting the voltage.
Please check the following points and tweak.
1.Set the DMI Voltage from 1.8v to 1.85v or higher
2.Change Core PLL Voltage from 2.2v to the maximum value 2.4v
3.Change PLL Termination Voltage from 1.55v to 1.35v
4.Try adjust the value of PLL Bandwidth(between 2 and 6)
The optimum values of these voltage settings depend on the CPU.
Try increasing or decreasing fine tuning.
-キャッシュクロックが上がらないCPUの場合-
-Cache clock can not up-
PLL Termination Voltageを調整する。
まずは少し電圧を上げてみましょう。(1.65vくらいまで)
あまり上げすぎるとboot出来なかったりと弊害があります。
下げる方向で調整した方が良い結果が出る事が多いです。
(例 1.55vから1.35vへ変更)
Adjust PLL Termination Voltage.
First, up the voltage slightly. (about 1.65v)
Sometimes can’t boot if you up too much.
It is better to go down than go up.
(Ex. from 1.55v to 1.35v)
-メモリパフォーマンスが上がらない場合-
-Memory performance can not up-
これも後日詳しく説明いたします。
CPU VCCIO VoltageとCPU System Agent Voltageを調整します。
両方とも1.4vを中心に電圧を上げ下げで探っていきます。
通常はCPU VCCIO Voltageの方を高めに設定した方が調子が良いケースが多いです。
(例 CPU VCCIO Voltage 1.435v CPU System Agent Voltage 1.375vなど)
1.25vから1.5vの間で最適な値を探ってください。
I will explain in detail later.
Adjust CPU VCCIO Voltage and CPU System Agent Voltage.
Both will up or down the voltage around 1.4v.
Normally, it is often better to set the CPU VCCIO Voltage higher.
(Ex. CPU VCCIO Voltage 1.435v CPU System Agent Voltage 1.375v)
Please find the optimum value between 1.25v and 1.5v.
NEXT
Extreme Cooling Manual Memory Setting 1