前記事は3866MHzから4000MHz級のメモリのベンチ用の設定を解説いたしましたが、今回は4133MHzから4200MHz級のクラスを解説いたします。
お手持ちのメモリが前記事の設定で4133MHz起動が可能のようでしたら是非、トライしてみてはいがでしょうか。
何度もしつこく言いますが、BdieとAPEXの相性は不思議なものがあり、チップ表面をちゃんと冷やしたら驚くほど性格と耐性が変わってしまうものがあるので、Z170時代の選別落ちしてるメモリが眠っていたら是非、再検証された方がいいでしょうね。
実際、私の周囲でぶん廻ってるメモリはZ170時代は前記事の設定すら怪しかったメモリばかりです。
あと、私の所有しているエースのメモリは前記事の4000MHz起動が苦手で、今回の最速設定で急に元気になるという変わりモノです。
どのIMCと組み合わせてもそうなので、メモリ自体が得意なメモリ対比を持ってるのかもしれません。
しかも、一枚(シングルチャンネル)で動かすと全然廻らず、2枚セットで急に元気になるというオマケ付きです。
そういう事例も合わせて考えると、廻らないメモリも今後は細かく再検証すべきなのはなお更です。
4133設定から上になってくると速度も急激にアップします。
Z170時代ではほぼ不可能だったメモリ設定であり、ここからがZ270 APEXの真骨頂であると思います。
In the previous article I explained the settings for the memory bench from 3866MHz to 4000MHz level.
This time I will explain from 4133MHz to 4200MHz class.
I persistently say that the compatibility between Bdie and APEX is strange and there are memory that surprisingly change character and tolerance when the chip surface is cooled properly.
And my ace memory is not good at starting 4000 MHz as in the previous article, but it got better with the fastest setting like this article.
Since it is the same with any IMC, the memory may have own good DRAM Frequency Ratio.
Normal memory shows enough performance with single channel.
But my memory can demonstrate perfect performance only with dual channels.
Memory that doesn’t run too much should be revalidated again.
The speed will suddenly up when it goes above the 4133 setting.
It is almost impossible memory setting in the Z170 era.
There’s more to come of Z270 APEX.
Profile1
APEXで2D競技で上を狙う場合のベースとなる設定。
一番速度が出やすい。
Base setting when playing 2D with APEX and aiming at the top.
It is easy to get the speed.

Profile2
Profile1のtRDRD_drとtRDRD_ddを1-1から4-4に緩めた設定。
ほとんどProfile1と変わりないように見えるが限界領域では2,3クリック変わってしまう。
Set tRDRD_dr and tRDRD_dd of Profile1 loosened from 1-1 to 4-4.
It seems almost unchanged from Profile1, but it differs by a few clicks in the limit area.
Profile3
Profile2のDRAM REF Cycle Timeを220から240に緩めた設定。
Set DRAM REF Cycle Time of Profile2 loosened from 220 to 240.

Profile4
Profile3のtRCDを11から12へ、tWRRD_sg 21 tWRRD_dg 16 を tWRRD_sg 21 tWRRD_dg 17へ緩めた設定。
速度ロスも少なくクロックも上がりやすい。
Set tRCD of Profile3 from 11 to 12, and tWRRD_sg 21 tWRRD_dg 16 loosened to tWRRD_sg 21 tWRRD_dg 17.
Loss of speed is small and clock is easy to up.

どの設定も恐ろしく速度が出る設定ですので、お手持ちのメモリの性格を探った上で、4つの設定をうまく組み合わせて使うのもいいと思います。
たとえばレイテンシを詰めるより、ハイクロックが得意な性格のメモリの場合、Profile1のtRCDだけ12に変更させて使うとかもアリでしょう。
Every setting is very fast.
You can combine the four settings well after exploring the character of your memory.
For example, memory that is good at high clock than tight latency,it may be changed to 12 for only tRCD of Profile1.
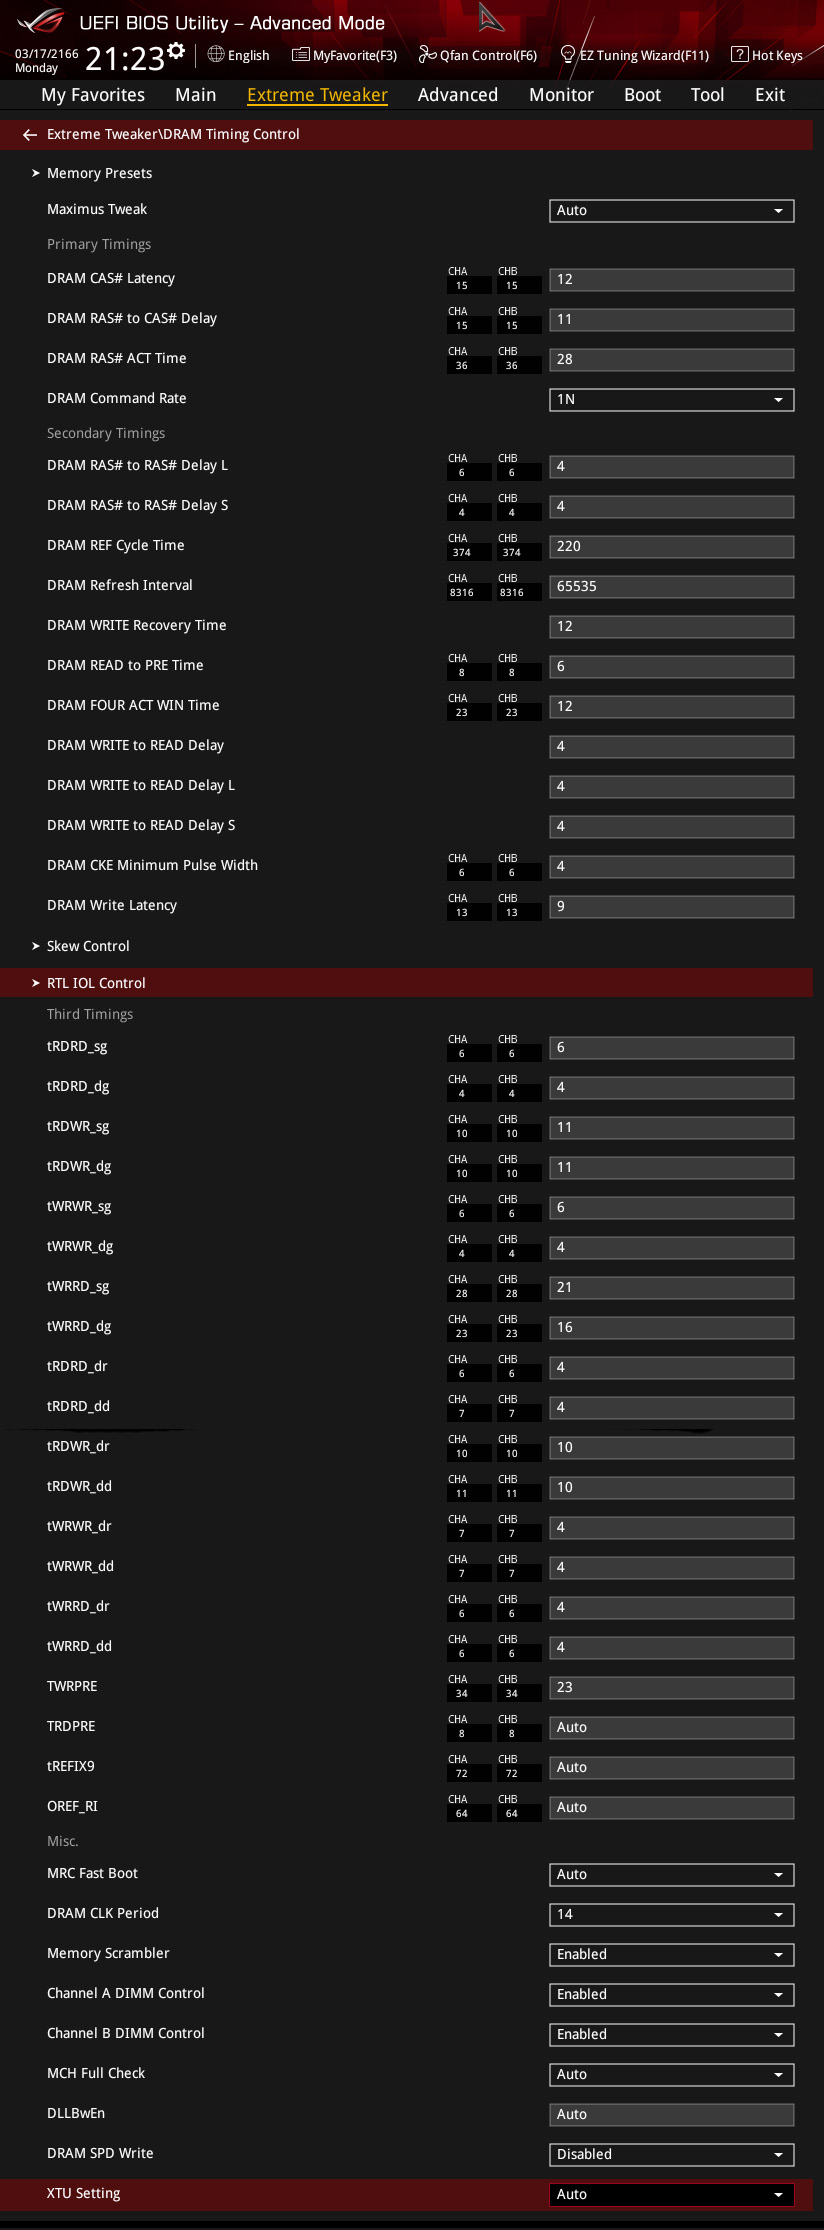
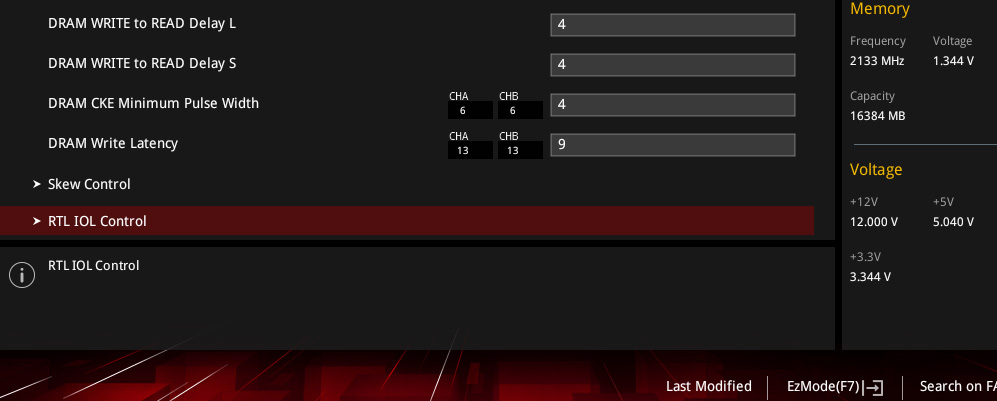
RTL IOL Controlは基本的に49:50:6:6に設定しますが、IMCとの相性が悪い場合は50:50:7:6に変更してください。
Basically, the RTL IOL Control is set to 49:50:6:6, but if incompatibility with IMC is bad, please change to 50:50:7:6.

今回も4段階に分けて徐々に緩めたProfileで解説していますが、その典型的な使用方法を説明いたします。
I explained the four stages profile which made it tight little by little.
I will explain the typical usage of them.
手持ちのメモリが最速設定Profile1ではメモリクロック4133MHzは走っても4150MHzくらいでエラーを吐くメモリだと仮定します。
Let’s assume that your memory is the fastest setting Profile1.
Your memory can run at the memory clock 4133MHz, but an error occurs at about 4150MHz.
例1
CPU側のベンチのクロック上限が6920MHz(100.3×69=CPU6920MHz)のCPUでプレイ
→BCLK100.3だとDRAM Clockは4145MHzなので、理論上はメモリ側は余裕という事になりProfile1設定のままトライ
Case:1
Play with CPU bench clock upper limit of 6920MHz(100.3×69=CPU6920MHz)
–>>With BCLK100.3, DRAM Clock is 4145MHz and the memory still has margin.
So try with Profile1 setting.
例2
CPU側のベンチのクロック上限が6934MHz(100.5×69=CPU6934MHz)のCPUでプレイ
→BCLK100.5だとDRAM Clockは4153MHzとなってしまいメモリ側の耐性が足りなくなってしまう
この場合、タイミングを緩めてクロックが上がりやすくなるProfile2を使う
BCLKとメモリクロックは上がっているので、思ったより速度ロスもない
Case:2
Play with CPU bench clock upper limit of 6934MHz(100.5×69=CPU6934MHz)
–>>With BCLK100.5, DRAM Clock is 4153MHz, so memory tolerance is not enough.
In this case, use the Profile2 which loose the timing and makes it easy to clock up.
BCLK and memory clock are high, so not much speed loss.
例3
CPU側のベンチのクロック上限が6951MHz(100.75×69=CPU6951MHz)のCPUでプレイ
→BCLK100.75だとDRAM Clockは4166MHzとなり緩いProfile2でも動作が怪しくなるかもしれない
Profile3にシフトさせる
Case:3
Play with CPU bench clock upper limit of 6951MHz(100.75×69=CPU6951MHz)
–>>With BCLK100.75,DRAM Clock is 4166MHz,it may stop working even with loose Profile2.
Shift to Profile3.
例4
運が良いのか?悪いのか(笑)CPU側のベンチのクロック上限が7000MHz弱のCPUでプレイ
→101.4×69=6996MHz/DRAM Clockは4191MHzまで上昇してしまう
もっともクロックが上がりやすいProfile4を使う
Case:4
Play with CPU bench clock upper limit is less than 7000MHz(Lucky or unlucky?lol)
–>>101.4×69=6996MHz/DRAM Clock will be up to 4191MHz.
Use the Profile4 that make it easiest for clock up.
このように上手く使い分けてください。
In this way, please use them properly.
2Dベンチ、特にスーパーパイやXTUはメモリチューニングが非常にスコアに影響しますので、お手持ちのメモリの最強の設定を見つけ出してください。
シネベンチ系はさほどメモリは関係しませんが、高いBCLKはスコアに反映しやすいです。
そうなると必然的にメモリクロックも上がる事になります。
Profile4あたりでぶん廻されるのも手だと思います。
2D bench, especially SPI and XTU, memory tuning has a great influence on the score.
Please find the strongest setting of your memory.
Memory is not much related to Cinebench, but high BCLK is easy to reflect on the score.
Then the memory clock will inevitably up.
Running in Profile4 may be one way.
幸運にもProfile1設定でも軽くDDR4-4200MHzオーバーできるようなメモリをお持ちならDRAM REF Cycle Timeを180から200の間に変更。
DRAM CKE Minimum Pulse Widthを4から3に変更。
この2つも試されてみてください。
If you have a lucky memory that can easily over DDR 4-4200MHz even with Profile1 setting, change DRAM REF Cycle Time to between 180 and 200.
DRAM CKE Changed Minimum Pulse Width from 4 to 3.
Please try these ways.
Extreme Cooling Beginners Manual (APEX) Basic setting 1
Extreme Cooling Beginners Manual (APEX) Basic setting 2
Extreme Cooling Manual Memory Setting 1
Extreme Cooling Manual Memory Setting 2